


I finally got around to making my own rope bowl! Well, first off I saw a Pinterest idea for wrapping the rope around containers, kind of a recycling idea and I liked it, but I could not settle on a container and what on earth I would use it for... so instead I coiled the rope on itself and made a bowl!
For two days after I walked around saying, "I made a bowl!"I was ecstatic! Seriously ... I made it, it turned out great! Yay me! *insert excited clap here* I know it is silly but I have not done any crafting in ages and i was just giddy to be successful. My dh did not believe I made it lol, he thought I bought it, so I guess that is a success too! <3
So here we go! First, excuse the light which is different in every darn pic, it was a pretty cloud day!
Supplies:
Manila Rope (I used 1/4"and 50ft and I got mine at Home Depot)
hot glue gun
glue sticks ( I used 4 1/2 mini ones)
a tv, laptop, or other device

So you start by simply coiling the rope on itself, and hot gluing as you go. The ends of this rope had a plastic thingy over it which I left one and it was great for adhering and staying where it was. Do not worry that it is anything but circular shaped to begin with, it will work itself out I promise!

See, it is starting to work itself out already! At this point however you will be wondering exactly how long this project is going to take. At least I did because I wanted to make sure the bottom was secure so I glued and then held til I knew it was dry and moved on. I did not want the bottom falling out from under the bowl when I was done.

By the time you get to this size you will seriously be considering making it into a coaster instead of a bowl. Having a computer or tv or something to occupy you while you mindlessly glue will help a lot! See my laptop...I was blog surfing! :) Do not worry though because at this point things will start going much quicker! It just seems like forever when it is so tiny.

Now, when your base is whatever size you want it to be, you are going to start going up. You just glue the top of the rope and curl up...no big deal I promise! The only thing I did here, and I tried to get a close up here for you, was I glued on the back portion of the top of the rope... so not dead center. This way my rope would not stack directly up and form a container like shape...not a bowl. I wanted it to slowly form out like a bowl so I did it this way and it works brilliantly!

After a few turns around you can see the shape your bowl is starting to take on! I was ... at this point, already falling in love! No more worries about how long this was taking me lol

Here is my finished product. Now I am dancing around telling the whole world I made my own bowl! lol Woohoo! You could put fabric on the bottom if you wish but I adore the natural look of this!

Here is a size reference for you... it is a good size bowl. NOT ginormous but certainly not one that will turn out tiny. When I was doing it I was not sure if I would have enough rope for the size I wanted. I did use the entire 50 ft of it I bought.. Which cost 5.50 and I already had everything else, so I am thinking 5 bucks is a good deal here!
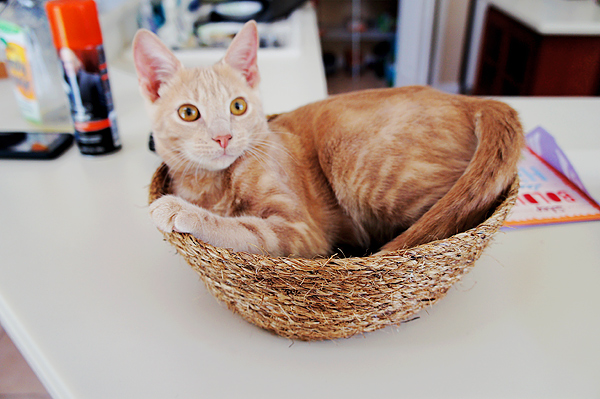
And just because this is insanely adorable... I had to share with you that Gunther LOVES it! Good thing I did not use sisal rope! lol Anyway I love how it turned out and I have another thing of rope I bought so I need to come up with another idea!
Thanks for looking and commenting! Have a wonderful week!
-Tanyia
Participating In:
Market Yourself Monday
Made with Love link up
Making Monday Marvelous
DIY Project Parade
What's in the Gunny Sack?
Sunday Showcase Party
Show Me What You Got
Take a Look Tuesday
Wow Me Wednesday
Show and Share at Southern Lovely
Whatever Goes Wednesday
Your Whims Wednesday
It's a Party at A Creative Princess
Show Off Your Stuff at Fireflies and Jellybeans
Link It Up Thursday


hehe LOVE Gunther in the bowl! Great project!
ReplyDeletethanks, Wendy! :)
DeleteYou did a really nice job on the bowl! Nice project!
ReplyDeletethanks Honey!
DeleteI love this bowl, and I love the name of your blog! I am a new follower from the I love my online friends blog hop and I'd love a follow back at http://www.two-in-diapers.blogspot.com when you get a chance! :)
ReplyDeletethanks so much, I will check out your blog!
DeleteLoved the picture with the cat!
ReplyDeleteNewest follower from TTWFI. Love for you to stop by and return the follow. Hosting Mom's Monday Mingle now. Love for you to link up!
www.thenaptimereview.com
hope to see you there!
thanks so much! I will stop by your blog!
DeleteLove the bowl! I had to chuckly a little when I saw your kitty in the bowl, looks like something one of mine would do. Found your site from Thee Networking Blog Hop!
ReplyDeleteBy the way, love the name of your blog!
thanks, Cynthia! lol he is a cutie ... even in my crafts! lol
DeleteNice job! Give you a glue gun and you can do anything.
ReplyDeleteyea... like burn my crafting table...and my fingers! lol
DeleteI like it. You forgot to mention how many hot glue burns you got though....lol
ReplyDeleteon this one? Not a single one! lol
DeleteThis is AWESOME!Super simple and cheap too! These things cost so much pre-made. I am totally going to try this! Thank you for sharing! Totally loving your blog!
ReplyDeleteKylie
absolutelyarkansas.blogspot.com
ty so much, Kylie!
DeleteThat turned out so cute! Stopping by from the Networking Blog Hop and now following along…I would love if you would stop by and say hello :)
ReplyDeleteModern Modest Beauty
thanks, Jenny!
Deleteπολυ εξυπνο και οικολογικο!!!
ReplyDeleteit's brilliant, simple, effective, exactly what you want in a craft project
ReplyDeletethanks for sharing
martine
Well done dear..looking perfect :)
ReplyDeleteI loved this idea!!!
ReplyDeleteThanks so much for linking up to Your Whims Wednesday, I featured this on my blog today! Stop by and grab a featured button :) http://www.mygirlishwhims.com/2012/08/your-whims-wednesday-74-and-features_28.html
ReplyDelete